WiFi / Cellular Chicken Feeder
I’ve wanted to get chickens for a while now (I actually had over 50 of them many years ago), but there’s always been one thing stopping us from pulling the trigger: Feeding them while we’re out of town. This certainly isn’t a very difficult problem to solve, it just takes a little time to plan it out and gather the parts to make a feeder that can be controlled remotely. I didn’t want to set up an automatic feeder, then depend on it while we’re away for two weeks only to find out that our flock died of starvation while we were on vacation. To solve this, I designed this WiFi (or Cellular) chicken feeder.
Backyard farming has become increasingly popular over the past few years, so I thought I would document this project and share it with anyone interested in re-creating one of these for their own backyard.
The feeder, like just about anything else I design, consists of two parts, hardware and software. Let’s start with the hardware, and go from there.
The Hardware
Selecting the proper container and dispensing mechanism was probably the most important part of this design process. The feeder will be used to dispense ‘Layer Crumbles’, a food that’s a crumb-like consistency, similar to dried crushed oatmeal.
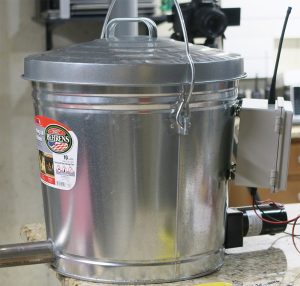
The hopper I used for this project is just a 10 gallon feed container which I picked up at a local farm supply store.
To dispense the feed from the hopper, I wanted a shaftless screw conveyor (sounds fancy!). A quick google search and you will see how expensive this equipment typically is (yikes!). So, I went looking for a household appliance that used the same part that I was looking for, as it would likely be much cheaper to buy a replacement part for a common appliance, than a piece of industrial equipment. While in Costco one day, I noticed that the Traeger smokers use exactly what I needed to move wood pellets into a meat smoker. A quick search and I found a nice long shaftless screw conveyor for only $35!


In order for the screw conveyor to work properly, it needs to be protected from jamming against the feed container, to do this I inserted it into a XXX inch stainless steel pipe, and cut away part of the pipe to allow the feed to enter the conveyor (see video). I chose to use stainless steel because it won’t wear down over time, unlike PVC or ABS which may wear down and result in plastic shavings in your chicken food. If you choose a different shaft conveyor, make sure to choose the correct diameter stainless steel pipe to go with it.
 To control the shaft, I used a gear motor from Automation Direct. Now, this is a very powerful motor to use for this project, but I already had it in my lab so I went with it. I’m sure you could use a much weaker (and less expensive) motor to achieve the same result. The motor has a 5/16″ shaft, and the internal diameter of the connecting shaft of the screw conveyor was a little larger than 5/16″ but with set screws it worked. There was a single hole
  already drilled through the shaft of the screw, so I tapped it with a 5MM tap and added a set screw. I ended up tapping a second hole and adding a second set screw for safety because the first one was a little loose.
Once I gathered all the parts, I assembled the dispenser by drilling two holes in either side of the container and inserting the stainless 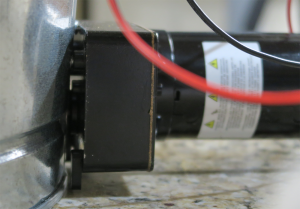 steel pipe through both holes. I mounted the motor on one end of the container using #10/32 screws per the spec sheet, then I sealed around the pipe with silicone to keep the feed from falling out around the edges.
To control the motor, and get it connected to WiFi, I used a Particle Photon (as you will start to notice this is pretty much my favorite way to get anything connected to the internet). If you’re not familiar, the photon is an arduino that you program over the air, and you can literally be up and running in less than 5 minutes with a project like this. No drivers to install, just connect it to WiFi and flash your code. Even if it’s on the other side of the globe.
The photon doesn’t have any built-in relays, so I used the 2 Relay board from NCD.io with the particle socket, which works with either the photon or the electron (for cellular). This board uses I2C to communicate with the 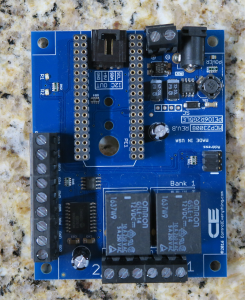 relays (which I’ll get into a little later on). The board also has some power circuitry for taking our 12V input down to the levels we need for the photon and relays. So all the hard work is done for us and all we have to deal with is the software.
While the feeder is intended to be controlled via WiFi, I wanted to also add the ability to control it with a remote control while I’m on the property, so in the event that I don’t have my phone, or I leave someone else in charge, they have a way to control it. To do this I used the NCD.io 8 Button Remote Control Fob (They call it a Key Fob – but I think it’s a little bog for that) and the overlay shield also from NCD.io. The remote has an incredible range (750ft LOS), and the overlay shield is pretty cool because it just plugs into the relay board overtop of the photon.
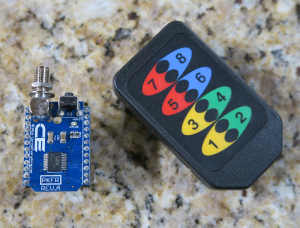 The remote control and overlay shield are totally optional, and aren’t required for the WiFi functionality to work.
To keep the electronics safe from the elements, I opted for a WH-10 from Polycase, these are IP66 rated enclosures so they can hold up to just about anything shy of submersion. I drilled 2 holes in the bottom of the enclosure for power and motor wiring, 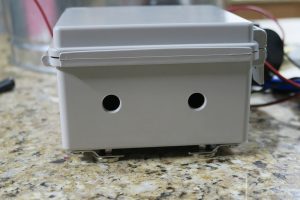 and one in the top for the remote control receiver antenna (this is not the WiFi antenna, so this hole is not necessary if you don’t plan on adding the RF remote control).
The relay board is mounted to the plastic mounting 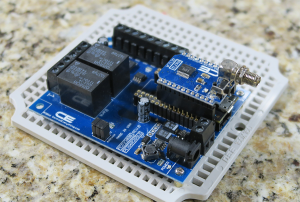 panel of the Polycase enclosure using some brass standoffs.
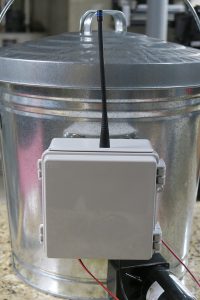
Parts List:
Dispenser:
- 12V DC Gear Motor
- 10 Gallon Feed Container
- Shaftless Screw Conveyor (Traeger Wood Pellet Smoker Grill Replacement Auger Assembly 075 Kit KIT0023)
- Stainless Steel Pipe
- Silicone Caulk
- Screws
- Shaft Set Screws
- Small Metal ‘L’ Bracket
Control:
- Polycase Enclosure (WH-10) and plastic mounting plate (WH-10K-01)
- Cable Glands
- NCD.io 2 Relay Board (optional)
- NCD.io 8 Button Fob (optional)
- NCD.io Receiver
- Particle Photon (or Electron for cellular)
- Sparkfun External WiFi Antenna (optional)
- Standoffs
- 12V Power Supply
- Misc. 18 AWG Wire
Solar Power (optional)
- 20W Solar Panel
- Solar Charge Controller
- Battery
- Misc 18 AWG Wire
Software
The software for this project is (mostly) loaded into the Particle Photon. Depending on which route you decide to go, there may also be some work to do on your mobile device (and I do recommend going that route, as I will explain).
Servings
The software is designed to dispense ‘Servings’ of chicken food. The serving size for the food I’m using is 1/4 pound per chicken, which takes 20 seconds to dispense. This will vary depending on your feed as well which screw conveyor and motor you use, so you will need to adjust this time measurement accordingly for your configuration.
I2C Relay control
There are a lot of ways to control relays, one of the more common ways is to simply wire a relay to an output of your arduino. The NCD.io board doesn’t work this way, instead it uses the I2C protocol to allow for expansion. This makes it possible to use the same 2 pins of the arduino to control many, many relays as they are addressable. Because of this, you will need to import the NCD2Relay library into your project in the Particle Web IDE.
Let’s get to it.
I mentioned that the Particle Photon is an arduino that you can update over the air (OTA). But there’s actually a lot more to it than OTA firmware updates. The Photon can connect to the Particle Cloud, it can host web pages, it can talk to your server, or even connect with third party cloud services.
For this project there are really 3 viable methods for controlling this feeder, 2 of which I will discuss along with sample code:
- You an host a web page on the photon, and connect directly to it using your mobile device or desktop. But this method would require port forwarding on your router.
- You could connect the photon to a third party cloud (Such as Blynk) and use the Blynk app on your mobile device (more secure and easier for most people than option 1).
- You could have the Photon communicate with a server on the internet and host a web page on that server which you access from your mobile device or desktop.
For this tutorial, I will cover options 1 and 2, and perhaps down the road we can discuss option 3 since I have several (hundred) photons currently configured this way, but if you’re only building one feeder, that’s a lot of work for a single endpoint.
Option 1: Hosting the web page on the photon itself
Note: If you want to skip straight to a practical more secure solution, go to Option 2 below. Option 1 works, but I wouldn’t recommend using it outside of your local network for testing.
This option is hands down the easiest for you to ‘cut and paste‘ and be up and running in under 5 minutes. You can literally copy my code below, modify the IP address info, wire up the motor and have a functional feeder.
Pros: This is fast to deploy, can look like a stand-alone app on your mobile device and is completely customize-able.
Cons: You would need to forward a port in your router, which for some routers may simply not work depending on how the requests are sent, which introduces security risks and is a major risk for DDoS attacks (they’re real and they are debilitating – and I can guarantee you will have them). Nonetheless, I wanted to share this method because there’s something to learn here.
If you want to try this out, simply get your photon connected to the cloud by following the setup instructions from Particle and copy the code below into a new project.
Note: Don’t forget to manually import the NCD2Relay library in the Web IDE – and you will most likely end up with that first line twice when you do so, so delete one of them if that happens.
|
1 2 3 4 5 6 7 8 9 10 11 12 13 14 15 16 17 18 19 20 21 22 23 24 25 26 27 28 29 30 31 32 33 34 35 36 37 38 39 40 41 42 43 44 45 46 47 48 49 50 51 52 53 54 55 56 57 58 59 60 61 62 63 64 65 66 67 68 69 70 71 72 73 74 75 76 77 78 79 80 81 82 83 84 85 86 87 88 89 90 91 92 93 94 95 96 97 98 99 100 101 102 103 104 105 106 107 108 109 110 111 112 113 114 115 116 117 118 119 120 121 122 123 124 125 126 127 128 129 130 131 132 133 134 135 136 137 138 139 140 141 142 143 144 145 146 147 148 149 150 151 152 153 154 155 156 157 158 159 160 161 162 163 164 165 166 167 168 169 170 171 172 173 174 175 176 177 178 179 180 181 182 183 184 185 186 187 188 189 190 191 192 193 194 195 196 197 198 199 200 201 202 203 204 205 206 207 208 209 210 211 212 213 214 215 216 217 218 219 220 221 222 223 224 225 226 227 228 229 230 231 232 233 234 235 236 237 238 239 240 241 242 243 244 245 246 247 248 249 250 251 252 253 254 255 256 257 258 259 260 261 262 263 264 265 266 267 268 269 270 271 272 273 274 275 276 277 278 279 280 281 282 283 284 285 286 287 288 289 290 291 292 293 294 295 296 297 298 299 300 301 302 303 304 305 306 307 308 309 310 311 312 313 314 315 |
// This #include statement was automatically added by the Particle IDE. #include <NCD2Relay.h> NCD2Relay relayController; // Our remote control buttons int buttonPin1 = A0; int buttonPin2 = A1; int buttonPin3 = D2; int buttonPin4 = D3; int buttonPin5 = D4; int buttonPin6 = D5; int buttonPin7 = D6; int buttonPin8 = D7; TCPClient webClient; TCPServer webServer = TCPServer(90); char myIpAddress[24]; String readString; long relayDuration = 0; long relayStartTime = 0; void setup() { //Turn off wifi so we can set up our static ip WiFi.off(); //Set static ip info IPAddress myAddress(10,87,0,180); IPAddress netmask(255,255,252,0); IPAddress gateway(10,87,0,1); IPAddress dns(10,87,0,1); //Actually set the static ip WiFi.setStaticIP(myAddress, netmask, gateway, dns); //Tell the photon to use the static ip WiFi.useStaticIP(); WiFi.on(); WiFi.connect(); //pins for RF remote inputs pinMode( A0 , INPUT_PULLUP); //remote pin 1 pinMode( A1 , INPUT_PULLUP); //remote pin 2 pinMode( D2 , INPUT_PULLUP); //remote pin 3 pinMode( D3 , INPUT_PULLUP); //remote pin 4 pinMode( D4 , INPUT_PULLUP); //remote pin 5 pinMode( D5 , INPUT_PULLUP); //remote pin 6 pinMode( D6 , INPUT_PULLUP); //remote pin 7 pinMode( D7 , INPUT_PULLUP); //remote pin 8 relayController.setAddress(1, 1, 1); // set the address for the relay board Particle.variable("ipAddress", myIpAddress, STRING); // make it so we can read the IP address variable of the photon in the particle console IPAddress myIp = WiFi.localIP(); // get the IP of the photon which is handed out via DHCP sprintf(myIpAddress, "%d.%d.%d.%d", myIp[0], myIp[1], myIp[2], myIp[3]); //Set the myIpAddress variable webServer.begin(); //start the webserver } void loop() { //Listen for button presses on the RF remote. If one of these buttons is pressed, feed the chickens the appropriate number of servings using the feedChickens function //REMOTE BUTTON 1 if(digitalRead( buttonPin1 ) == HIGH){ feedChickens(1); } //REMOTE BUTTON 2 if(digitalRead( buttonPin2 ) == HIGH){ feedChickens(2); } //REMOTE BUTTON 3 if(digitalRead( buttonPin3 ) == HIGH){ feedChickens(3); } //REMOTE BUTTON 4 if(digitalRead( buttonPin4 ) == HIGH){ feedChickens(4); } //REMOTE BUTTON 5 if(digitalRead( buttonPin5 ) == HIGH){ feedChickens(5); } //REMOTE BUTTON 6 if(digitalRead( buttonPin6 ) == HIGH){ feedChickens(6); } //REMOTE BUTTON 7 if(digitalRead( buttonPin7 ) == HIGH){ feedChickens(7); } //REMOTE BUTTON 8 if(digitalRead( buttonPin8 ) == HIGH){ feedChickens(8); } //let's look at the http requests now if (webClient.connected() && webClient.available()) { while (webClient.connected()) { if (webClient.available()) { char c = webClient.read(); //read char by char HTTP request if (readString.length() < 500) { //store characters to string readString += c; //Serial.print(c); } //if HTTP request has ended if (c == '\n') { serveWebpage(); //look for arguments and feed the chickens appropriately similar to what we did with the RF buttons. if (readString.indexOf("?button1") >0){ feedChickens(1); } if (readString.indexOf("?button2") >0){ feedChickens(2); } if (readString.indexOf("?button3") >0){ feedChickens(3); } if (readString.indexOf("?button4") >0){ feedChickens(4); } if (readString.indexOf("?button5") >0){ feedChickens(5); } if (readString.indexOf("?button6") >0){ feedChickens(6); } if (readString.indexOf("?button7") >0){ feedChickens(7); } if (readString.indexOf("?button8") >0){ feedChickens(8); } //clear the readString variable so it's empty for the next go around readString = ""; } } } } else { webClient = webServer.available(); } //check to see if it's time to close that relay! What we are doing here is turning the relay off if the feeding duration has elapsed if ((millis() - relayStartTime) > relayDuration) { relayController.turnOffRelay(1); } } //This function builds the response for the web page which will be displayed to the user in the browser. void serveWebpage() { webClient.println("HTTP/1.1 200 OK"); webClient.println("Content-Type: text/html"); webClient.println(); webClient.println("<HTML>"); webClient.println("<HEAD>"); webClient.println("<link rel=\"shortcut icon\" href=\"http://joedidit.com/projects/chickenfeeder/favicon.ico\" type=\"image/x-icon\" />"); webClient.println("<link rel=\"apple-touch-icon\" sizes=\"114×114\" href=\"http://joedidit.com/projects/chickenfeeder/apple-touch-icon-114x114.png\" />"); webClient.println("<link rel=\"apple-touch-icon\" sizes=\"72×72\" href=\"http://joedidit.com/projects/chickenfeeder/apple-touch-icon-72x72.png\" />"); webClient.println("<link rel=\"apple-touch-icon\" href=\"http://joedidit.com/projects/chickenfeeder/apple-touch-icon.png\" />"); webClient.println("<meta name='apple-mobile-web-app-capable' content='yes' />"); webClient.println("<meta name='apple-mobile-web-app-status-bar-style' content='black' />"); webClient.println("<style type=\"text/css\">"); webClient.println("body{ margin:60px 0px; padding:0px; text-align:center;"); webClient.println("}"); webClient.println("h1 { text-align: center; font-family:Arial, \"Trebuchet MS\", Helvetica, "); webClient.println("sans-serif;"); webClient.println("}"); webClient.println("h2 { text-align: center; font-family:Arial, \"Trebuchet MS\", Helvetica, "); webClient.println("sans-serif;"); webClient.println("}"); webClient.println("a { text-decoration:none; width:75px; height:50px; border-color:black; "); webClient.println("border-top:2px solid; border-bottom:2px solid; border-right:2px solid; "); webClient.println("border-left:2px solid; border-radius:10px 10px 10px; "); webClient.println("-o-border-radius:10px 10px 10px; -webkit-border-radius:10px 10px 10px; "); webClient.println("font-family:\"Trebuchet MS\",Arial, Helvetica, sans-serif; "); webClient.println("-moz-border-radius:10px 10px 10px; background-color:#293F5E; "); webClient.println("padding:8px; text-align:center;"); webClient.println("}"); webClient.println(".buttonRed { text-decoration:none; width:90px; height:50px; border-color:black; "); webClient.println("border-top:2px solid; border-bottom:2px solid; border-right:2px solid; "); webClient.println("border-left:2px solid; border-radius:10px 10px 10px; "); webClient.println("-o-border-radius:10px 10px 10px; -webkit-border-radius:10px 10px 10px; "); webClient.println("font-size: 28px;"); webClient.println("font-family:\"Trebuchet MS\",Arial, Helvetica, sans-serif; "); webClient.println("-moz-border-radius:10px 10px 10px; background-color:#EB190F; "); webClient.println("padding:40px; text-align:center;"); webClient.println("}"); webClient.println(".buttonYellow { text-decoration:none; width:90px; height:50px; border-color:black; "); webClient.println("border-top:2px solid; border-bottom:2px solid; border-right:2px solid; "); webClient.println("border-left:2px solid; border-radius:10px 10px 10px; "); webClient.println("-o-border-radius:10px 10px 10px; -webkit-border-radius:10px 10px 10px; "); webClient.println("font-family:\"Trebuchet MS\",Arial, Helvetica, sans-serif; "); webClient.println("font-size: 28px;"); webClient.println("-moz-border-radius:10px 10px 10px; background-color:#D1CC22; "); webClient.println("padding:40px; text-align:center;"); webClient.println("}"); webClient.println(".buttonGreen { text-decoration:none; width:90px; height:50px; border-color:black; "); webClient.println("border-top:2px solid; border-bottom:2px solid; border-right:2px solid; "); webClient.println("border-left:2px solid; border-radius:10px 10px 10px; "); webClient.println("-o-border-radius:10px 10px 10px; -webkit-border-radius:10px 10px 10px; "); webClient.println("font-family:\"Trebuchet MS\",Arial, Helvetica, sans-serif; "); webClient.println("font-size: 28px;"); webClient.println("-moz-border-radius:10px 10px 10px; background-color:#11D51A; "); webClient.println("padding:40px; text-align:center;"); webClient.println("}"); webClient.println(".buttonBlue { text-decoration:none; width:90px; height:50px; border-color:black; "); webClient.println("border-top:2px solid; border-bottom:2px solid; border-right:2px solid; "); webClient.println("border-left:2px solid; border-radius:10px 10px 10px; "); webClient.println("-o-border-radius:10px 10px 10px; -webkit-border-radius:10px 10px 10px; "); webClient.println("font-family:\"Trebuchet MS\",Arial, Helvetica, sans-serif; "); webClient.println("font-size: 28px;"); webClient.println("-moz-border-radius:10px 10px 10px; background-color:#157EFC; "); webClient.println("padding:40px; text-align:center;"); webClient.println("}"); webClient.println("a:link {color:white;} /* unvisited link */ a:visited {color:white;} /* "); webClient.println("visited link */ a:hover {color:white;} /* mouse over link */ a:active "); webClient.println("{color:white;} /* selected link */"); webClient.println("</style>"); webClient.println("<TITLE>Chicken Feeder</TITLE>"); webClient.println("</HEAD>"); webClient.println("<BODY>"); webClient.println("<H1>Chicken Feeder</H1>"); webClient.println("<hr />"); webClient.println("<br />"); webClient.println("<br />"); webClient.println("<br />"); webClient.println("<br />"); webClient.println("<br />"); webClient.println("<br />"); webClient.println("<br />"); webClient.println("<br />"); webClient.println("<br />"); webClient.println("<br />"); webClient.println("<br />"); webClient.println("<br />"); webClient.println("<br />"); webClient.println("<br />"); webClient.println("<br />"); webClient.println("<br />"); webClient.println("<br />"); webClient.println("<br />"); webClient.println("<br />"); webClient.println("<br />"); webClient.println("<br />"); webClient.println("<br />"); webClient.println("<a class=\"buttonRed\" href=\"/?button7\"\">7 Servings</a>"); webClient.println("<a class=\"buttonBlue\" href=\"/?button8\"\">8 Servings</a><br />"); webClient.println("<br />"); webClient.println("<br />"); webClient.println("<br />"); webClient.println("<br />"); webClient.println("<br />"); webClient.println("<br />"); webClient.println("<br />"); webClient.println("<a class=\"buttonRed\" href=\"/?button5\"\">5 Servings</a>"); webClient.println("<a class=\"buttonBlue\" href=\"/?button6\"\">6 Servings</a><br />"); webClient.println("<br />"); webClient.println("<br />"); webClient.println("<br />"); webClient.println("<br />"); webClient.println("<br />"); webClient.println("<br />"); webClient.println("<br />"); webClient.println("<a class=\"buttonYellow\" href=\"/?button3\"\">3 Servings</a>"); webClient.println("<a class=\"buttonGreen\" href=\"/?button4\"\">4 Servings</a><br />"); webClient.println("<br />"); webClient.println("<br />"); webClient.println("<br />"); webClient.println("<br />"); webClient.println("<br />"); webClient.println("<br />"); webClient.println("<br />"); webClient.println("<a class=\"buttonYellow\" href=\"/?button1\"\">1 Servings</a>"); webClient.println("<a class=\"buttonGreen\" href=\"/?button2\"\">2 Servings</a><br />"); webClient.println("<br />"); webClient.println("</BODY>"); webClient.println("</HTML>"); delay(1000); //stopping webClient webClient.flush(); webClient.stop(); delay(100); } //This function converts the number of servings into the number of milliseconds the motor needs to run void feedChickens(long servings) { relayController.turnOnRelay(1); //turn on the relay for the motor relayDuration = servings * 3000; //sset the amount of time that should pass before turning the relay off. relayStartTime = millis(); //set the start time to now. char publishString[40]; //create a char so we can publisn to the console if(Particle.connected() == true){ //only run the next lines if we are connected to the particle cloud sprintf(publishString, "%d Servings", servings); //build the publish string Particle.publish("Dispensing Feed", publishString); //publish to the cloud } } //a strtofloat string we use to convert strings to floats float strToFloat(String str) { char carray[str.length() + 1]; // determine size of array str.toCharArray(carray, sizeof(carray)); // put str into an array return atof(carray); } |
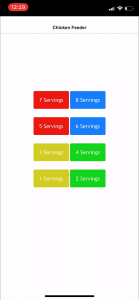
I commented the code quite a bit, so it should be pretty self explanatory. You will need to modify the IP, net mask, gateway and DNS to match your network. Once you do that, simply point your browser to the IP address you chose and you will be presented with a webpage that lets you control the feeder!
Option 2.
This option uses the Blynk app. If you’ve never used the Blynk app, you will always use the Blynk app after today. Because, well, wow.
Blynk is basically a drag and drop app builder right on your phone. With it, you will be able to create an app laid out exactly how you want it, then connect it to your photon using your auth token. It’s that simple!
To get started with Blynk, download the app on your phone. Copy the code below into the Particle Web IDE.
|
1 2 3 4 5 6 7 8 9 10 11 12 13 14 15 16 17 18 19 20 21 22 23 24 25 26 27 28 29 30 31 32 33 34 35 36 37 38 39 40 41 42 43 44 45 46 47 48 49 50 51 52 53 54 55 56 57 58 59 60 61 62 63 64 65 66 67 68 69 70 71 72 73 74 75 76 77 78 79 80 81 82 83 84 85 86 87 88 89 90 91 92 93 94 95 96 97 98 99 100 101 102 103 104 105 106 107 108 109 110 111 112 113 114 115 116 117 118 119 120 121 122 123 124 125 126 127 128 129 130 131 132 133 134 135 136 137 138 139 140 141 142 143 144 145 146 147 148 149 150 151 152 153 154 155 156 157 158 159 160 161 162 163 164 165 166 167 168 169 170 171 172 173 174 175 176 177 178 179 180 181 182 183 184 |
#define BLYNK_PRINT Serial // This #include statement was automatically added by the Particle IDE. #include <blynk.h> char auth[] = "XXXXXXXXXXXXXXXXXXXXXXXX"; WidgetTerminal terminal(V0); // This #include statement was automatically added by the Particle IDE. #include <NCD2Relay.h> NCD2Relay relayController; // Our remote control buttons int buttonPin1 = A0; int buttonPin2 = A1; int buttonPin3 = D2; int buttonPin4 = D3; int buttonPin5 = D4; int buttonPin6 = D5; int buttonPin7 = D6; int buttonPin8 = D7; //create variables for the Blynk button states int blynk1Button = 0; int blynk2Button = 0; int blynk3Button = 0; int blynk4Button = 0; int blynk5Button = 0; int blynk6Button = 0; int blynk7Button = 0; int blynk8Button = 0; long relayDuration = 0; //how long the relay will stay closed to power the motor long relayStartTime = 0; //what time (millis) did we engage the motor BLYNK_WRITE(V1) //Button Widget is writing to pin V1 { blynk1Button = param.asInt(); } BLYNK_WRITE(V2) //Button Widget is writing to pin V2 { blynk2Button = param.asInt(); } BLYNK_WRITE(V3) //Button Widget is writing to pin V3 { blynk3Button = param.asInt(); } BLYNK_WRITE(V4) //Button Widget is writing to pin V4 { blynk4Button = param.asInt(); } BLYNK_WRITE(V5) //Button Widget is writing to pin V5 { blynk5Button = param.asInt(); } BLYNK_WRITE(V6) //Button Widget is writing to pin V6 { blynk6Button = param.asInt(); } BLYNK_WRITE(V7) //Button Widget is writing to pin V7 { blynk7Button = param.asInt(); } BLYNK_WRITE(V8) //Button Widget is writing to pin V8 { blynk8Button = param.asInt(); } void setup() { Blynk.begin(auth); //start blynk terminal.clear(); //clear the contents of the terminal terminal.println(F("Chicken Feeder Booting...")); //write this fancy line of code to the terminal terminal.flush(); //send the data to the terminal //pins for RF remote inputs pinMode( A0 , INPUT_PULLUP); //remote pin 1 pinMode( A1 , INPUT_PULLUP); //remote pin 2 pinMode( D2 , INPUT_PULLUP); //remote pin 3 pinMode( D3 , INPUT_PULLUP); //remote pin 4 pinMode( D4 , INPUT_PULLUP); //remote pin 5 pinMode( D5 , INPUT_PULLUP); //remote pin 6 pinMode( D6 , INPUT_PULLUP); //remote pin 7 pinMode( D7 , INPUT_PULLUP); //remote pin 8 relayController.setAddress(1, 1, 1); // set the address for the relay board delay(300); //throw in a delay because it looks fancy this way when booting terminal.println(F("Done.")); terminal.flush(); } void loop() { Blynk.run(); //run Blynk stuff //Listen for button presses on the RF remote. If one of these buttons is pressed, feed the chickens the appropriate number of servings using the feedChickens function //REMOTE BUTTON 1 if(digitalRead( buttonPin1 ) == HIGH){ feedChickens(1); } //REMOTE BUTTON 2 if(digitalRead( buttonPin2 ) == HIGH){ feedChickens(2); } //REMOTE BUTTON 3 if(digitalRead( buttonPin3 ) == HIGH){ feedChickens(3); } //REMOTE BUTTON 4 if(digitalRead( buttonPin4 ) == HIGH){ feedChickens(4); } //REMOTE BUTTON 5 if(digitalRead( buttonPin5 ) == HIGH){ feedChickens(5); } //REMOTE BUTTON 6 if(digitalRead( buttonPin6 ) == HIGH){ feedChickens(6); } //REMOTE BUTTON 7 if(digitalRead( buttonPin7 ) == HIGH){ feedChickens(7); } //REMOTE BUTTON 8 if(digitalRead( buttonPin8 ) == HIGH){ feedChickens(8); } //now let's check to see if any of the Blynk buttons have been pressed. If so, dispense the appropriate number of servings if(blynk1Button == 1){ feedChickens(1); } if(blynk2Button == 1){ feedChickens(2); } if(blynk3Button == 1){ feedChickens(3); } if(blynk4Button == 1){ feedChickens(4); } if(blynk5Button == 1){ feedChickens(5); } if(blynk6Button == 1){ feedChickens(6); } if(blynk7Button == 1){ feedChickens(7); } if(blynk8Button == 1){ feedChickens(8); } //check to see if it's time to close that relay! What we are doing here is turning the relay off if the feeding duration has elapsed if ((millis() - relayStartTime) > relayDuration) { relayController.turnOffRelay(1); //terminal.println("Done."); } } //This function converts the number of servings into the number of milliseconds the motor needs to run void feedChickens(long servings) { relayController.turnOnRelay(1); //turn on the relay for the motor relayDuration = servings * 3000; //sset the amount of time that should pass before turning the relay off. relayStartTime = millis(); //set the start time to now. char publishString[40]; //create a char so we can publisn to the console if(Particle.connected() == true){ //only run the next lines if we are connected to the particle cloud sprintf(publishString, "Dispensing %d Servings", servings); //build the publish string terminal.println(publishString); terminal.flush(); delay(100); } } |
The fastest way to get set up is to clone the app I’ve already created by opening the Blynk App and scanning the QR code below:
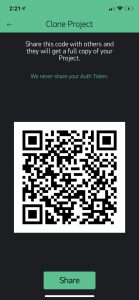
This will automatically generate an auth token, which should be e-mailed to you. Copy that token and replace the ‘XXXXXXXXXXXXXX’ in the above code and flash it to your Photon.
You’re ALL SET!
Press the number of servings you want, and you will feed some chickens!
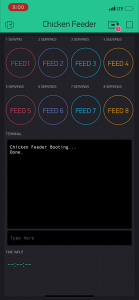
Manually Designing the Blynk App
If you want to manually lay out the Blynk app for this project, you can do that also, simply add 8 buttons and a terminal and link them up to the following:
Button 1: V1
Button 2: V2
Button 3: V3
Button 4: V4
Button 5: V5
Button 6: V6
Button 7: V7
Button 8: V8
Terminal: V0
Going Cellular
To make this a cellular project, simply replace the photon with an electron! It’s really that easy (well, you’ll also have to replace the antenna too).
The Particle Photon and Electron are interchangeable on the relay board, so you can swap them and flash the code into the electron to make this feeder work where there’s no WiFi!